A2UI over Model Context Protocol (MCP)
This guide shows you how to serve rich, interactive A2UI interfaces from an MCP server using Tools and Embedded Resources. By the end, you'll have a working MCP server that returns A2UI components to any MCP-compatible client.
Prerequisites
Ensure you have the following installed before you begin:
- Python (version 3.10 or later).
- uv for fast Python package management.
- Node.js (version 18 or later) for the MCP Inspector.
Quick Start: Run the Sample
Before diving into the protocol details, let's get a working example running. The A2UI repo includes a ready-to-go MCP recipe demo.
# Clone the repo (if you haven't already)
git clone https://github.com/a2ui-project/a2ui.git
cd a2ui/samples/mcp/a2ui-over-mcp-recipe

# Start the MCP server (SSE transport on port 8000)
uv run .
Option A: Interacting via the MCP Inspector
In a separate terminal, launch the MCP Inspector to interact with the server:
In the Inspector:
- Set Transport Type to
SSE - Connect to
http://localhost:8000/sse - Click List Resources → you'll see "Recipe Form" resource.
- Read the
a2ui://recipe-formresource → the resource content is the A2UI JSON that renders the simple form. - Click List Tools → you'll see
get_recipe_a2ui - Run the tool → the response contains A2UI JSON that renders a recipe card
NOTE: Note
The sample uses a local path reference to the A2UI Agent SDK. For your own projects, install from PyPI:
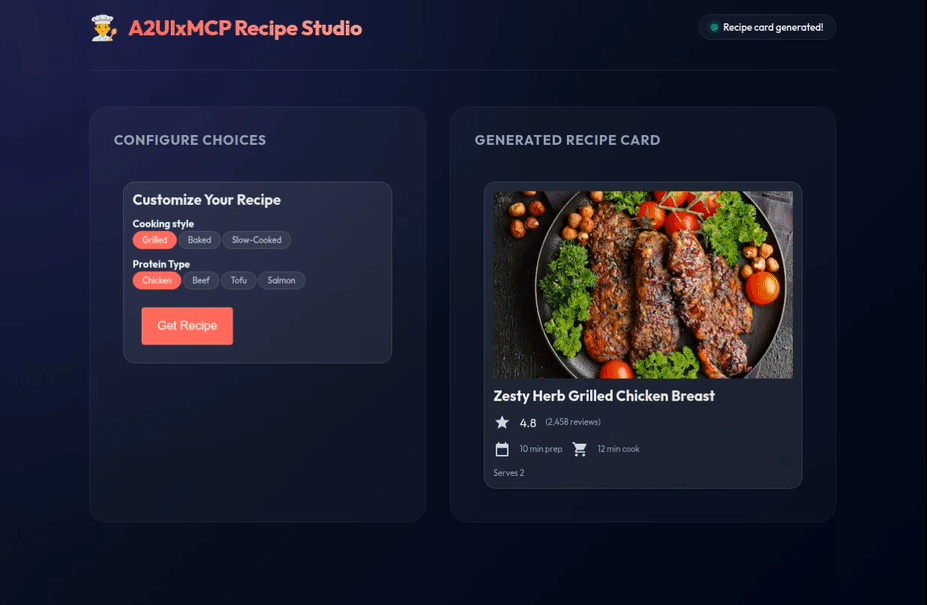
Option B: Running the Recipe Client Web App
For a fully rendered interactive experience that visually demonstrates A2UI over MCP, run the included web application:
Package Manager Usage: Running the built-in sample applications within the A2UI repository requires Yarn (yarn install / yarn dev) as configured by Corepack workspaces. For your own regular usage and standalone projects outside this repository, use the package manager of your choice (e.g. npm, pnpm).
- In a new terminal window, navigate to the client directory:
- Install Node.js dependencies:
- Start the Vite development server:
- Open your browser to the URL displayed in your terminal (usually
http://localhost:5173).
You will see a premium, responsive dual-column interface where the left column renders the Selection Form from MCP Resource (a2ui://recipe-form). Picking options and clicking "Get Recipe" executes the MCP Tool (get_recipe_a2ui), dynamically rendering the returned custom A2UI recipe card in the right column.
See all samples at samples/community/mcp/.
How It Works
There are two primary ways an MCP server can deliver A2UI content to a client:
- Via Reading a Resource (
resources/read): The client reads an MCP resource directly (e.g.,a2ui://recipe-form). The server returns the A2UI JSON payload directly. - Via Calling a Tool (
tools/call): The client calls an MCP tool (e.g.,get_recipe_a2ui). The server returns the A2UI JSON payload wrapped as an Embedded Resource inside the tool response.
In both cases, the client detects the application/a2ui+json MIME type and routes the payload to an A2UI renderer.
MIME Type Uniformity
Regardless of the delivery channel (whether fetched directly as a Resource or returned inside a Tool's CallToolResult), the A2UI JSON payload is always identified by the application/a2ui+json MIME type. In Tool responses, the payload must be wrapped inside an EmbeddedResource carrying this MIME type. This uniform identification allows client-side middleware to seamlessly intercept and route both static resources and dynamic tool responses to A2UI.
1. Resource-based Delivery Flow (resources/read)
Client → resources/read → MCP Server
                             ↓
                 Retrieve A2UI JSON
                             ↓
Client ← ResourceContents ← MCP Server
          (application/a2ui+json)
   ↓
A2UI Renderer displays UI
2. Tool-based Delivery Flow (tools/call)
Client → tools/call → MCP Server
                         ↓
              Generate A2UI JSON
                         ↓
         Wrap as EmbeddedResource
              (application/a2ui+json)
                         ↓
Client ← CallToolResult ← MCP Server
   ↓
A2UI Renderer displays UI
Resources vs. Tools: Separation of Utility Focus
When designing an A2UI integration over MCP, you should choose between Resources and Tools depending on whether the UI payload is static or dynamic.
1. Static UI via MCP Resources (resources/read)
For simple, static user interfaces that do not depend on user prompt inputs or conversation history, you should serve A2UI directly as an MCP Resource.
- Concept: The client reads a pre-defined A2UI resource using a standard resource URI (e.g.,
a2ui://recipe-form). - Use Case: Ideal for static configuration forms, selection screens, settings dashboards, or stable layouts.
- Benefit: Extremely simple to implement, low overhead, and doesn't require the LLM/Agent to make a tool call to fetch the structure.
Python Server Example:
@app.list_resources()
async def list_resources() -> list[types.Resource]:
    return [
        types.Resource(
            uri="a2ui://recipe-form",
            name="Recipe Form",
            mimeType="application/a2ui+json",
            description="Static form allowing users to pick options.",
        )
    ]

@app.read_resource()
async def read_resource(uri: str) -> list[ReadResourceContents]:
    if uri == "a2ui://recipe-form":
        return [
            ReadResourceContents(
                content=json.dumps(recipe_form_json),
                mime_type="application/a2ui+json",
            )
        ]
    raise ValueError(f"Unknown resource: {uri}")
2. Dynamic UI via MCP Tools (tools/call)
For user interfaces that need to be generated dynamically based on the conversational context, user parameters, or real-time data, you should serve A2UI inside an MCP Tool's response.
- Concept: The client/Agent calls a tool with specific arguments (e.g., chosen ingredients, preferences), and the server returns a customized A2UI JSON wrapped inside an
EmbeddedResourcein theCallToolResult. - Use Case: Ideal for content that depends on live database queries, previous inputs, interactive step-by-step wizard state, or personalized recommendations (e.g., a customized recipe card).
- Benefit: Maximizes flexibility, context-awareness, and supports highly dynamic flows.
- Best Practice (Fallback Text): Always include a
TextContentalongside yourEmbeddedResourcein theCallToolResult. Clients that don't support A2UI will fall back to displaying this text to the user.
Python Server Example:
@app.call_tool()
async def handle_call_tool(name: str, arguments: dict[str, Any]) -> types.CallToolResult:
    if name == "get_recipe_a2ui":
        # Resolve dynamic selections from client parameters
        style = arguments.get("cookingStyle", "Baked")
        protein = arguments.get("protein", "Salmon")

        # Retrieve customized recipe database entry
        recipe_data = RECIPES.get((style, protein))

        # Customize base A2UI schema dynamically
        custom_recipe_json = copy.deepcopy(recipe_a2ui_json)
        custom_recipe_json[1]["updateComponents"]["components"][0]["text"] = recipe_data["title"]

        # Return customized recipe card as EmbeddedResource
        return types.CallToolResult(content=[
            types.EmbeddedResource(
                type="resource",
                resource=types.TextResourceContents(
                    uri="a2ui://recipe-card",
                    mimeType="application/a2ui+json",
                    text=json.dumps(custom_recipe_json),
                )
            )
        ])
Catalog Negotiation
Before a server can send A2UI to a client, they must establish which catalogs are available. Depending on your architecture, this can happen in one of two ways.
Option A: During MCP Initialization (Recommended)
MCP is a stateful session protocol, so the most efficient approach is to declare capabilities once during connection setup. The client declares its A2UI support under capabilities:
{
  "jsonrpc": "2.0",
  "method": "initialize",
  "id": "init-123",
  "params": {
    "protocolVersion": "2025-11-25",
    "clientInfo": {
      "name": "a2ui-enabled-client",
      "version": "1.0.0"
    },
    "capabilities": {
      "a2ui": {
        "clientCapabilities": {
          "v0.9": {
            "supportedCatalogIds": [
              "https://a2ui.org/specification/v0_9/catalogs/basic/catalog.json"
            ]
          }
        }
      }
    }
  }
}
The server stores this state for the duration of the session.
Option B: Per-Message Metadata (For Stateless Servers)
If your server must remain stateless, the client can pass A2UI capabilities in the _meta field of every tool call:
{
  "jsonrpc": "2.0",
  "method": "tools/call",
  "id": "id-123",
  "params": {
    "name": "generate_report",
    "arguments": {"date": "2026-03-01"},
    "_meta": {
      "a2ui": {
        "clientCapabilities": {
          "v0.9": {
            "supportedCatalogIds": [
              "https://a2ui.org/specification/v0_9/catalogs/basic/catalog.json"
            ],
            "inlineCatalogs": []
          }
        }
      }
    }
  }
}
Handling User Actions
Interactive components like Button can trigger actions that are sent back to the server as MCP tool calls.
1. Define a Button with an Action
In your A2UI JSON, add an action to a component:
{
  "id": "confirm-button",
  "component": {
    "Button": {
      "child": "confirm-button-text",
      "action": {
        "event": {
          "name": "confirm_booking",
          "context": {
            "start": "/dates/start",
            "end": "/dates/end"
          }
        }
      }
    }
  }
}
2. Client Sends the Action as a Tool Call
When the user clicks the button, the client resolves data bindings (like /dates/start) against the surface state and sends a tool call:
{
  "jsonrpc": "2.0",
  "method": "tools/call",
  "id": "id-456",
  "params": {
    "name": "action",
    "arguments": {
      "name": "confirm_booking",
      "context": {
        "start": "2026-03-20",
        "end": "2026-03-25"
      }
    }
  }
}
3. Handle the Action on the Server
@self.tool()
async def action(name: str, context: dict) -> types.CallToolResult:
    """Handle A2UI user actions."""
    if name == "confirm_booking":
        # Process the booking, then return confirmation UI
        return types.CallToolResult(content=[
            types.TextContent(
                type="text",
                text=f"Booking confirmed: {context['start']} to {context['end']}"
            )
        ])
    raise ValueError(f"Unknown action: {name}")
Error Handling
Clients can report A2UI rendering errors back to the server via a tool call:
{
  "jsonrpc": "2.0",
  "method": "tools/call",
  "id": "id-789",
  "params": {
    "name": "error",
    "arguments": {
      "code": "INVALID_JSON",
      "message": "Failed to parse A2UI payload.",
      "surfaceId": "default"
    }
  }
}
Handle it on the server:
@self.tool()
async def error(code: str, message: str, surfaceId: str = "") -> types.CallToolResult:
    """Handle A2UI client errors."""
    # Log the error, retry, or send a fallback UI
    return types.CallToolResult(content=[
        types.TextContent(
            type="text",
            text=f"Acknowledged error {code}: {message}"
        )
    ])
Verbalization and Visibility Control
Control whether the LLM can "read" A2UI payloads in subsequent turns using MCP Resource Annotations:
a2ui_resource = types.EmbeddedResource(
    type="resource",
    resource=types.TextResourceContents(
        uri="a2ui://training-plan-page",
        mimeType="application/a2ui+json",
        text=json.dumps(a2ui_payload)
    ),
    # Show the UI to the user, but hide the raw JSON from the LLM
    annotations=types.Annotations(audience=["user"])
)
| Audience | Behavior |
|---|---|
| (empty) | Visible to both user and LLM |
["user"] |
Rendered for the user; hidden from LLM context |
["assistant"] |
Available to LLM for follow-up reasoning; not rendered |
Using the A2UI Agent SDK
For production use, the A2UI Agent SDK handles schema management, validation, and prompt generation for you:
from a2ui.schema.manager import A2uiSchemaManager
from a2ui.basic_catalog.provider import BasicCatalog

# Initialize the schema manager with the basic catalog
schema_manager = A2uiSchemaManager(
    catalogs=[BasicCatalog.get_config()],
)

# Validate A2UI output before sending
selected_catalog = schema_manager.get_selected_catalog()
selected_catalog.validator.validate(a2ui_payload)
See the full Agent Development Guide for details on schema management, dynamic catalogs, and streaming.
Next Steps
- A2UI Specification — full protocol reference
- Component Gallery — browse available components
- MCP Apps in A2UI Surface — embed HTML-based MCP apps inside A2UI
- Client Setup — build a renderer that displays A2UI