Step-by-Step Walkthrough
Run the app first, then read the second half with it open: every idea there is something you can see on screen. The app is samples/travel-a2ui in A2UI Labs: one Python server, a React client for the web and a Flutter client for mobile.
Run it
You need Python 3.11+, plus Node 20+ for the web app and Flutter 3.38+ for the mobile app.
-
Get the code:
Terminal window git clone https://github.com/a2ui-project/labscd labs/samples/travel-a2ui -
Start the server with both clients:
Terminal window ./scripts/quickstart.sh bothOr
reactfor the web app only, orflutterfor the mobile app only. The script installs the server into.venv, builds the clients (Flutter takes about a minute) and starts the server. Its output, trimmed (your versions will differ):→ Checking what is installedPython 3.11.18node v22.23.4→ The Python serverinstalled into .venv→ The React client✓ built in 456ms→ The Flutter client✓ Built build/web→ Starting on port 8080React: http://127.0.0.1:8080Flutter: http://127.0.0.1:8080/flutter/No GEMINI_API_KEY set: paste a key into the app when it asks. -
Open the web app at http://127.0.0.1:8080 and the mobile app at http://127.0.0.1:8080/flutter/.
The web app
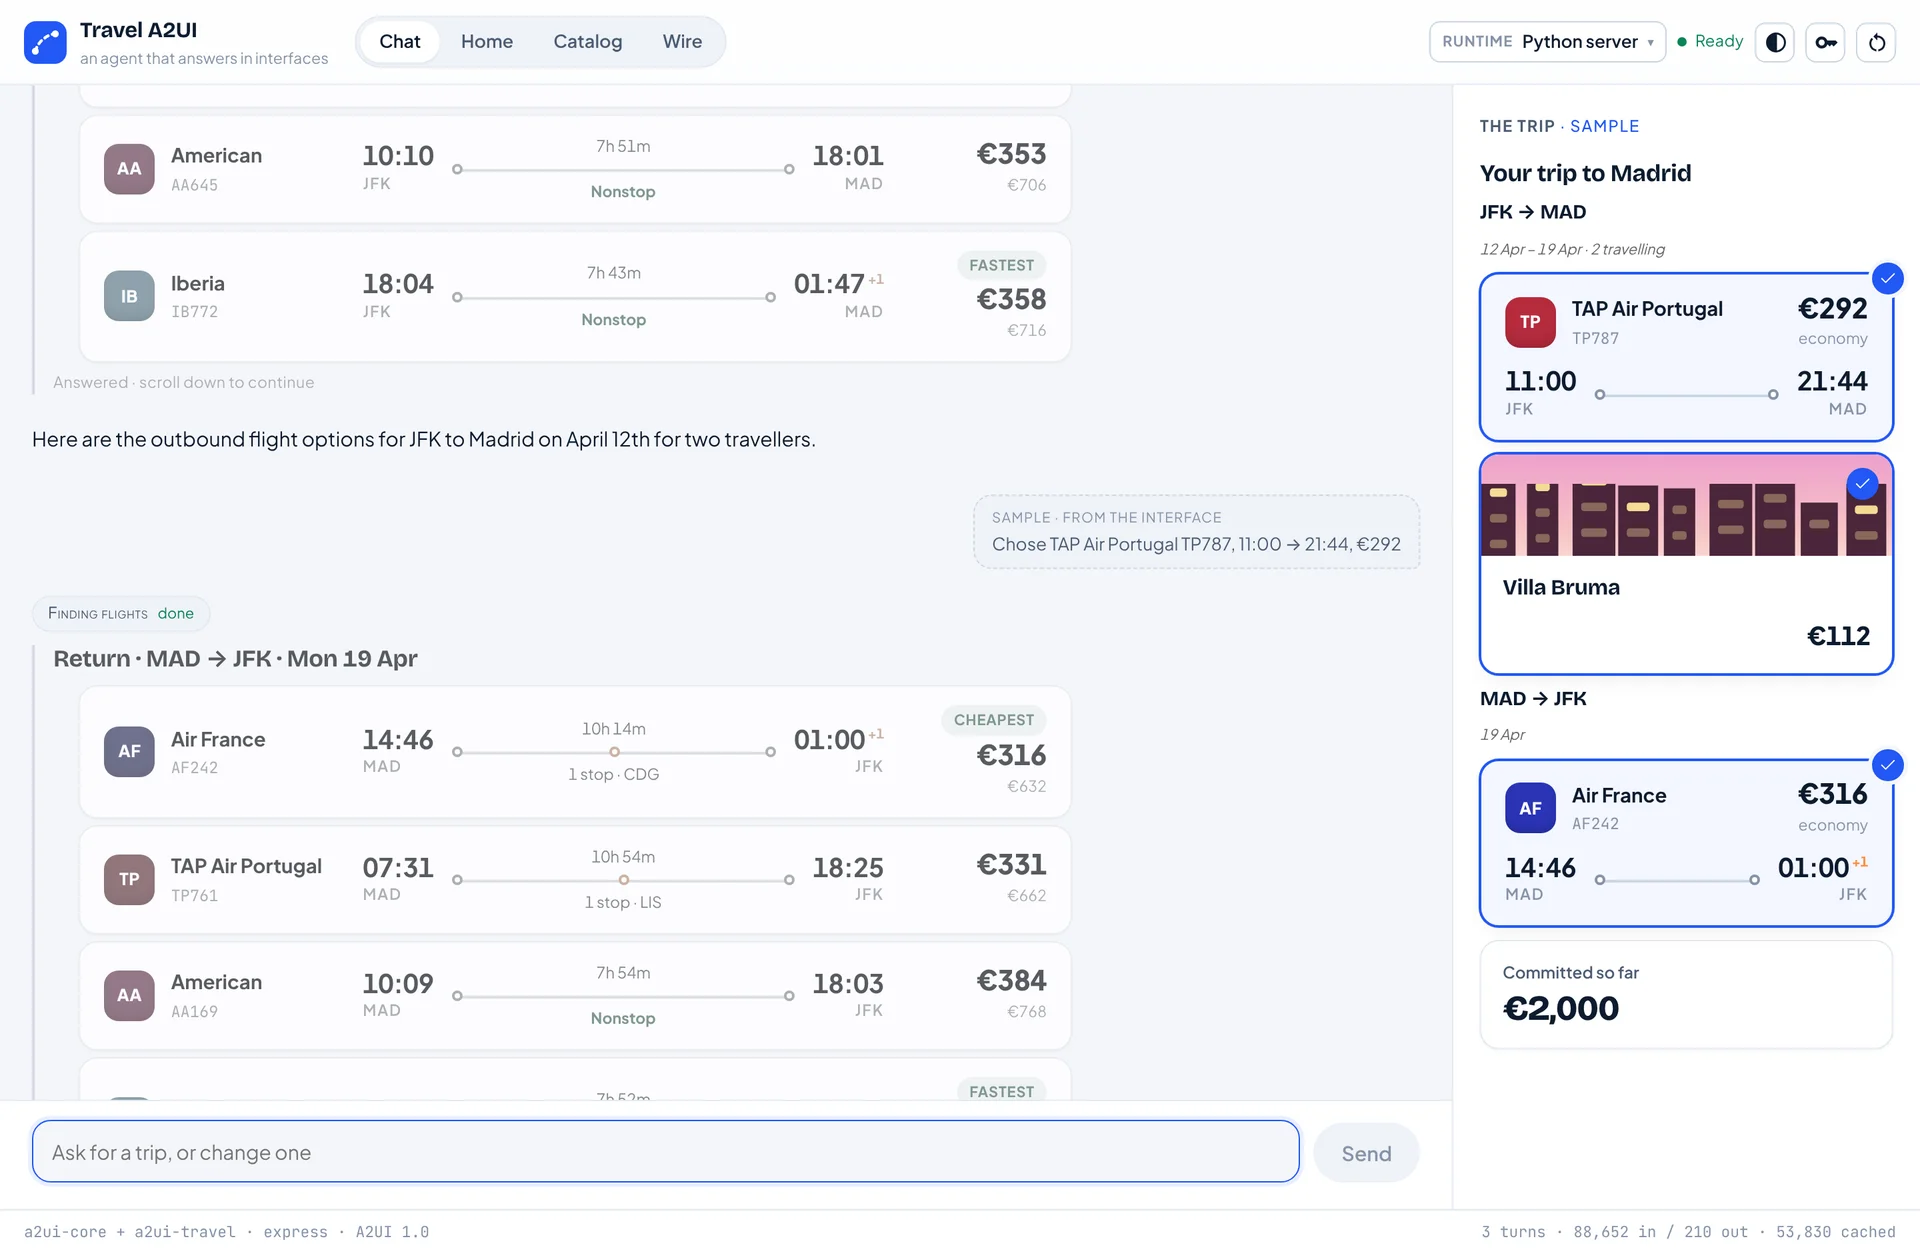
You land on a recorded sample trip, no key needed. To talk to the agent, paste a free Gemini key from AI Studio when the app asks (it stays in your browser), then try “Six days in Madrid in April, two of us, around $2,500 all in”.
The mobile app
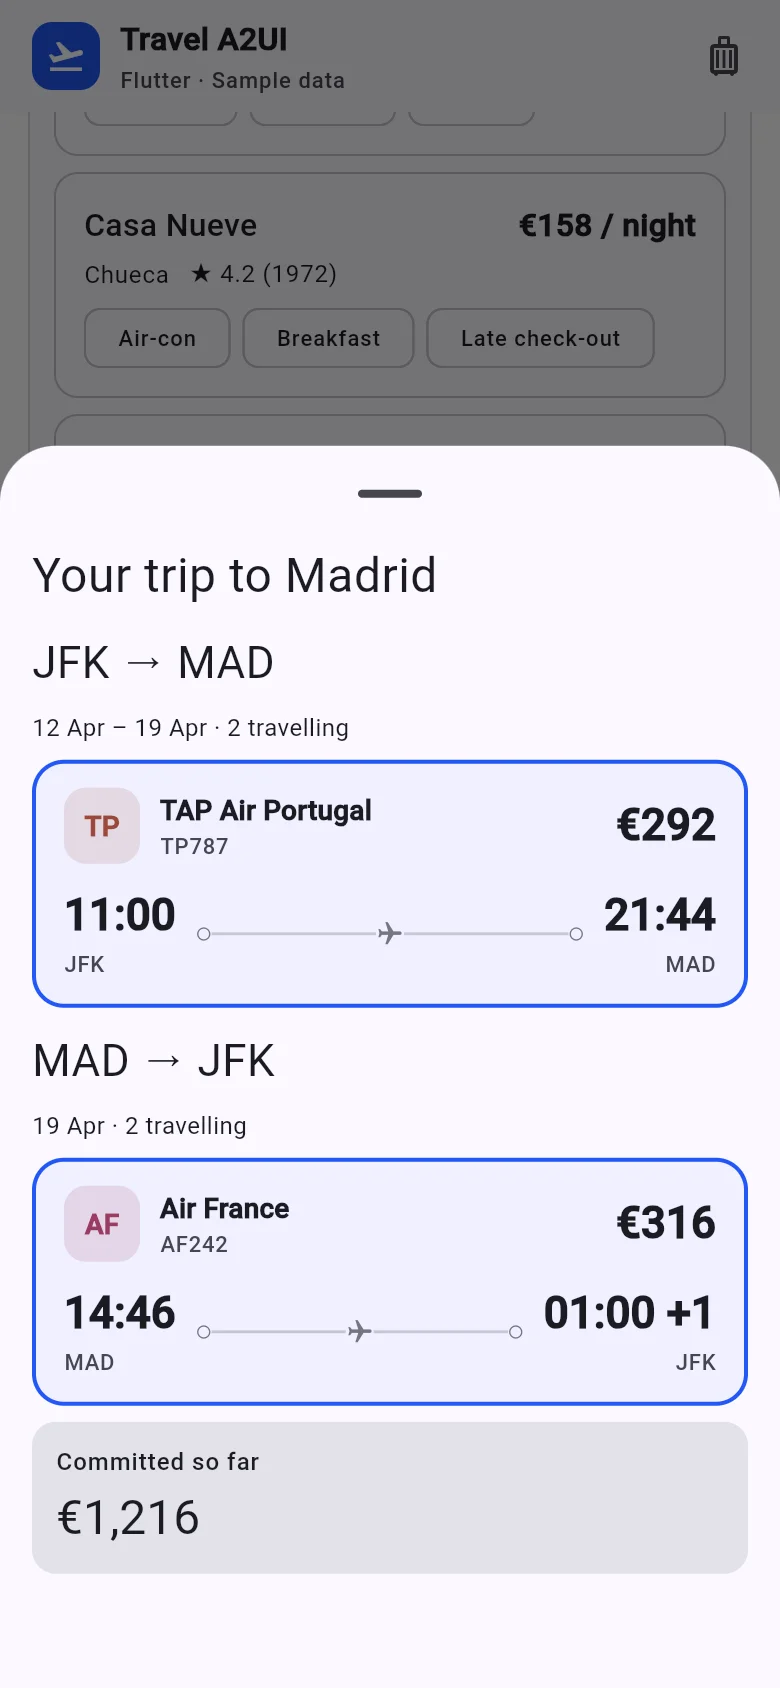
Paste your key, then try “A weekend in Lisbon from JFK in May, two of us”. Here Flutter is built for the web, in a phone layout; the same Dart code can target iOS and Android, which this sample does not set up. Ask both apps the same thing: the same messages, drawn by two renderers.
How A2UI works
Five short steps, in the order you meet them on screen: what on the screen is A2UI, what the agent is allowed to draw, how the model learns it, what travels to the client, and what draws it. For all of it in one picture, see how A2UI fits into this app.
1. What is A2UI, and what is app code
Not everything on screen is A2UI. Blue is composed by the agent; grey is app code, written by you, the builder, and the same on every turn:
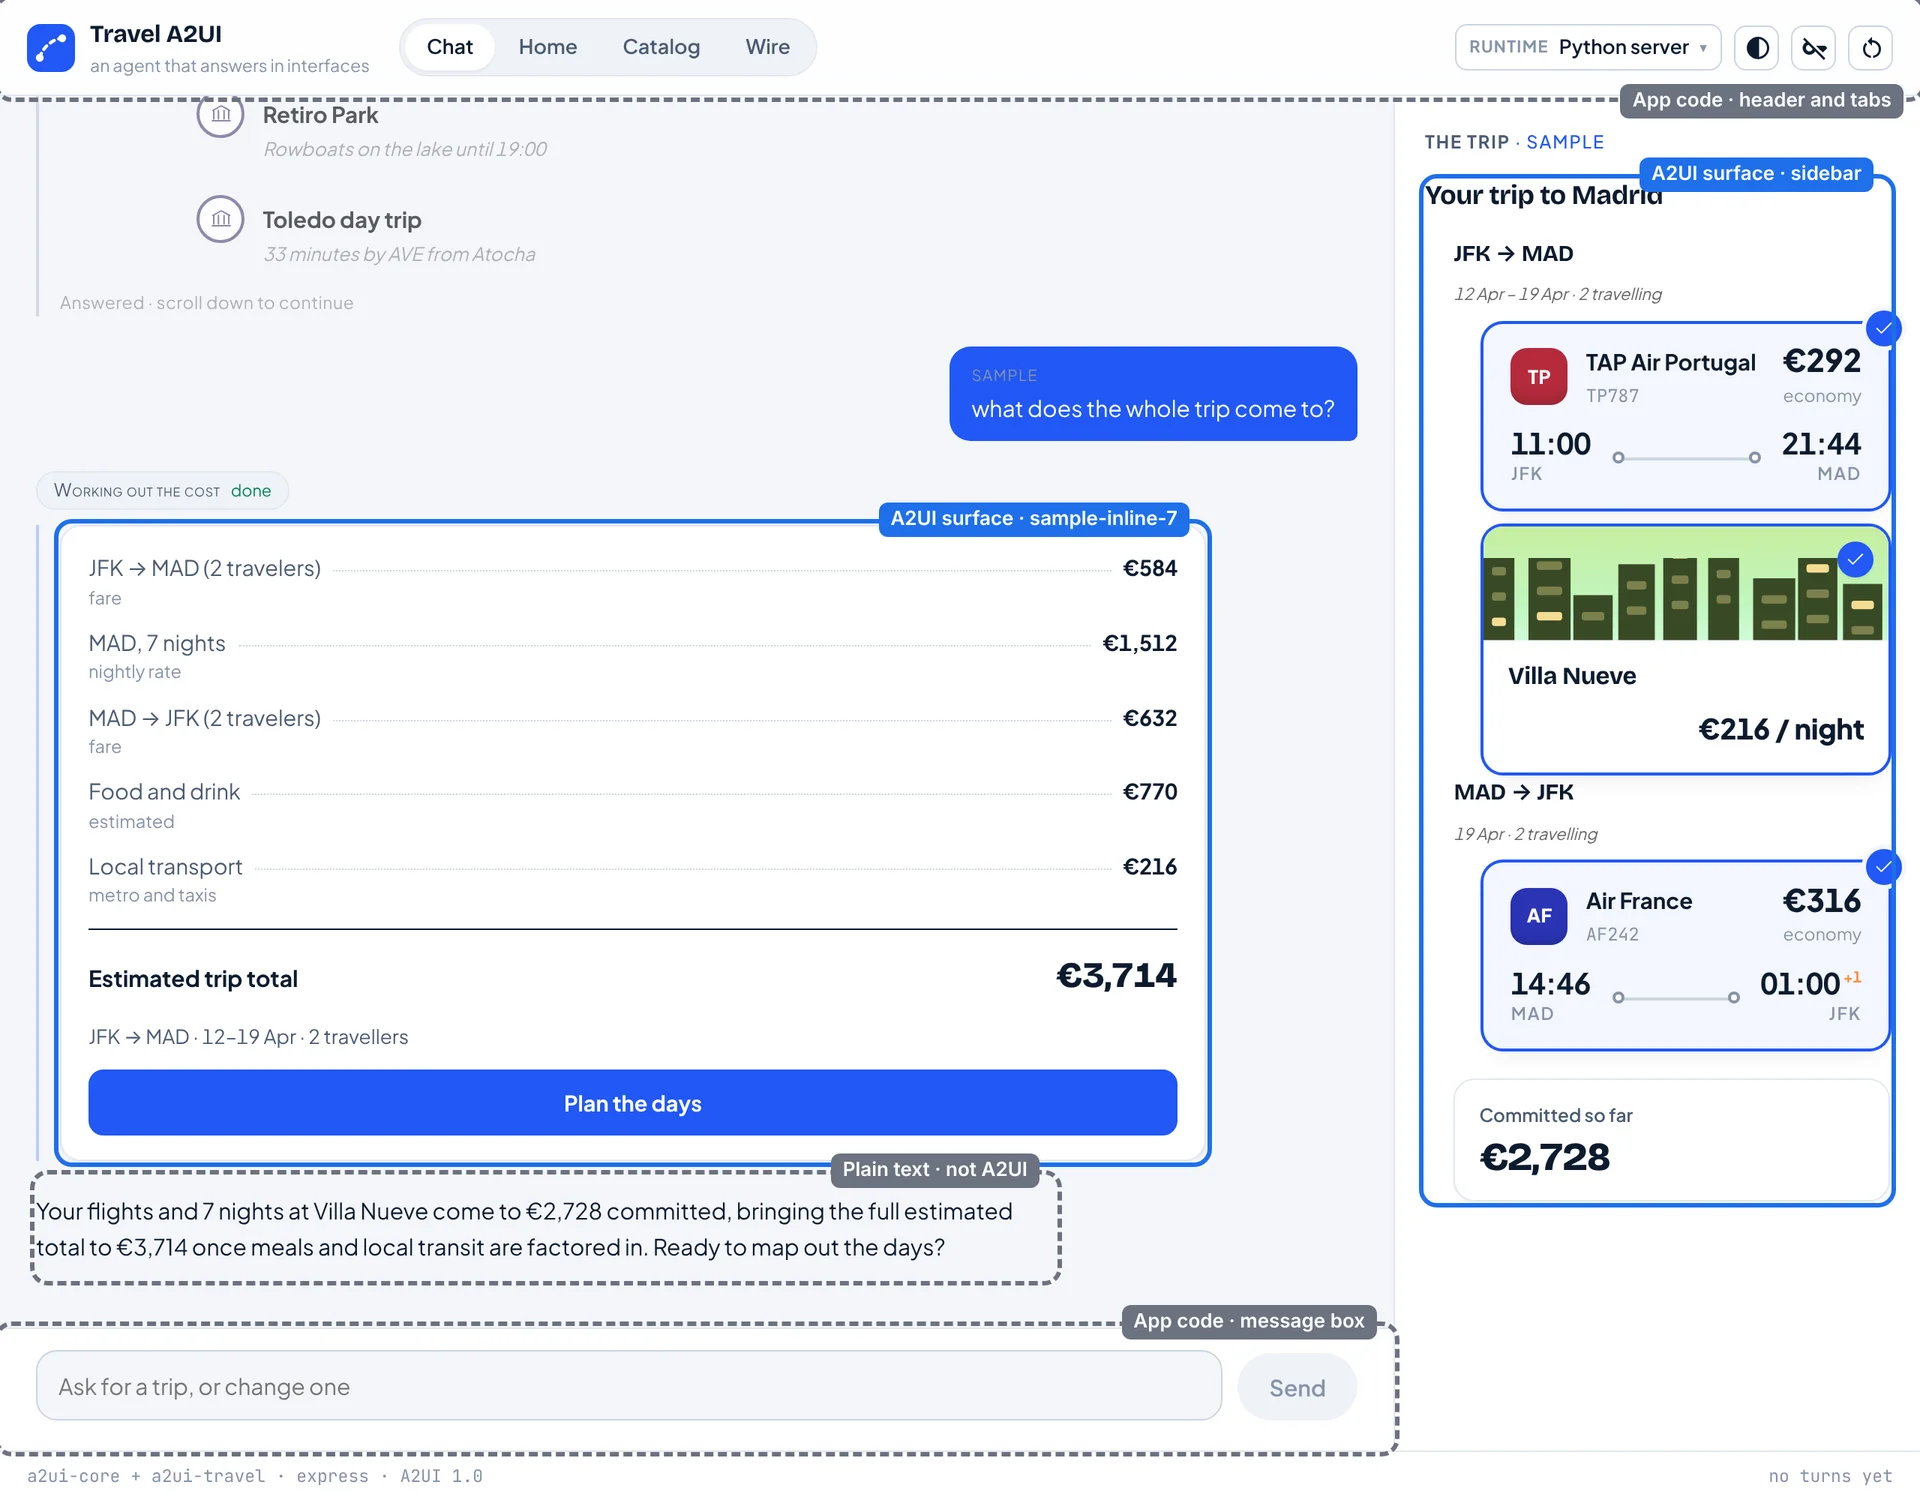
- A2UI, composed by the agent: the cards in the conversation, the trip panel (the trip sheet in Flutter) and the web client’s Home dashboard.
- App code: the header and tabs, the message box, the chat bubbles (the model’s words, shown as plain text), the key form, and the Catalog and Wire tabs.
Each blue region is a surface: one area of UI the agent controls. A surface
is made of components (a Text, a Button, a FlightOption), and the
values they show come from the surface’s data model. When the user taps a
flight, the agent receives an action saying which one.
A rule of thumb for your own app: if it should look the same on every turn, build it yourself as app code; if it depends on what the user just asked, let the agent compose it.
2. The catalog: what the agent may draw
The catalog (catalogs/a2ui-travel/catalog.json) lists everything the
agent may use, and it holds two kinds of thing:
-
Components, and the properties each takes. A2UI’s basic catalog provides
Text,Row,Column,List,Button,TextFieldand more; this app adds travel components such asFlightOption,HotelCard,DateRangePickerandPriceSummary. A component can hold others, so a card is a small arrangement of catalog components. -
Functions, which run in the client. The basic ones format and check values (
formatCurrency,formatDate,pluralize,required); this app addscalcNightsandequals. A component can show a function’s result, so the night count follows the dates the user picks, with no turn to the agent:"${calcNights(start: ${/trip/startDate}, end: ${/trip/endDate})} nights"
The web client’s Catalog tab draws every component with the real renderer:
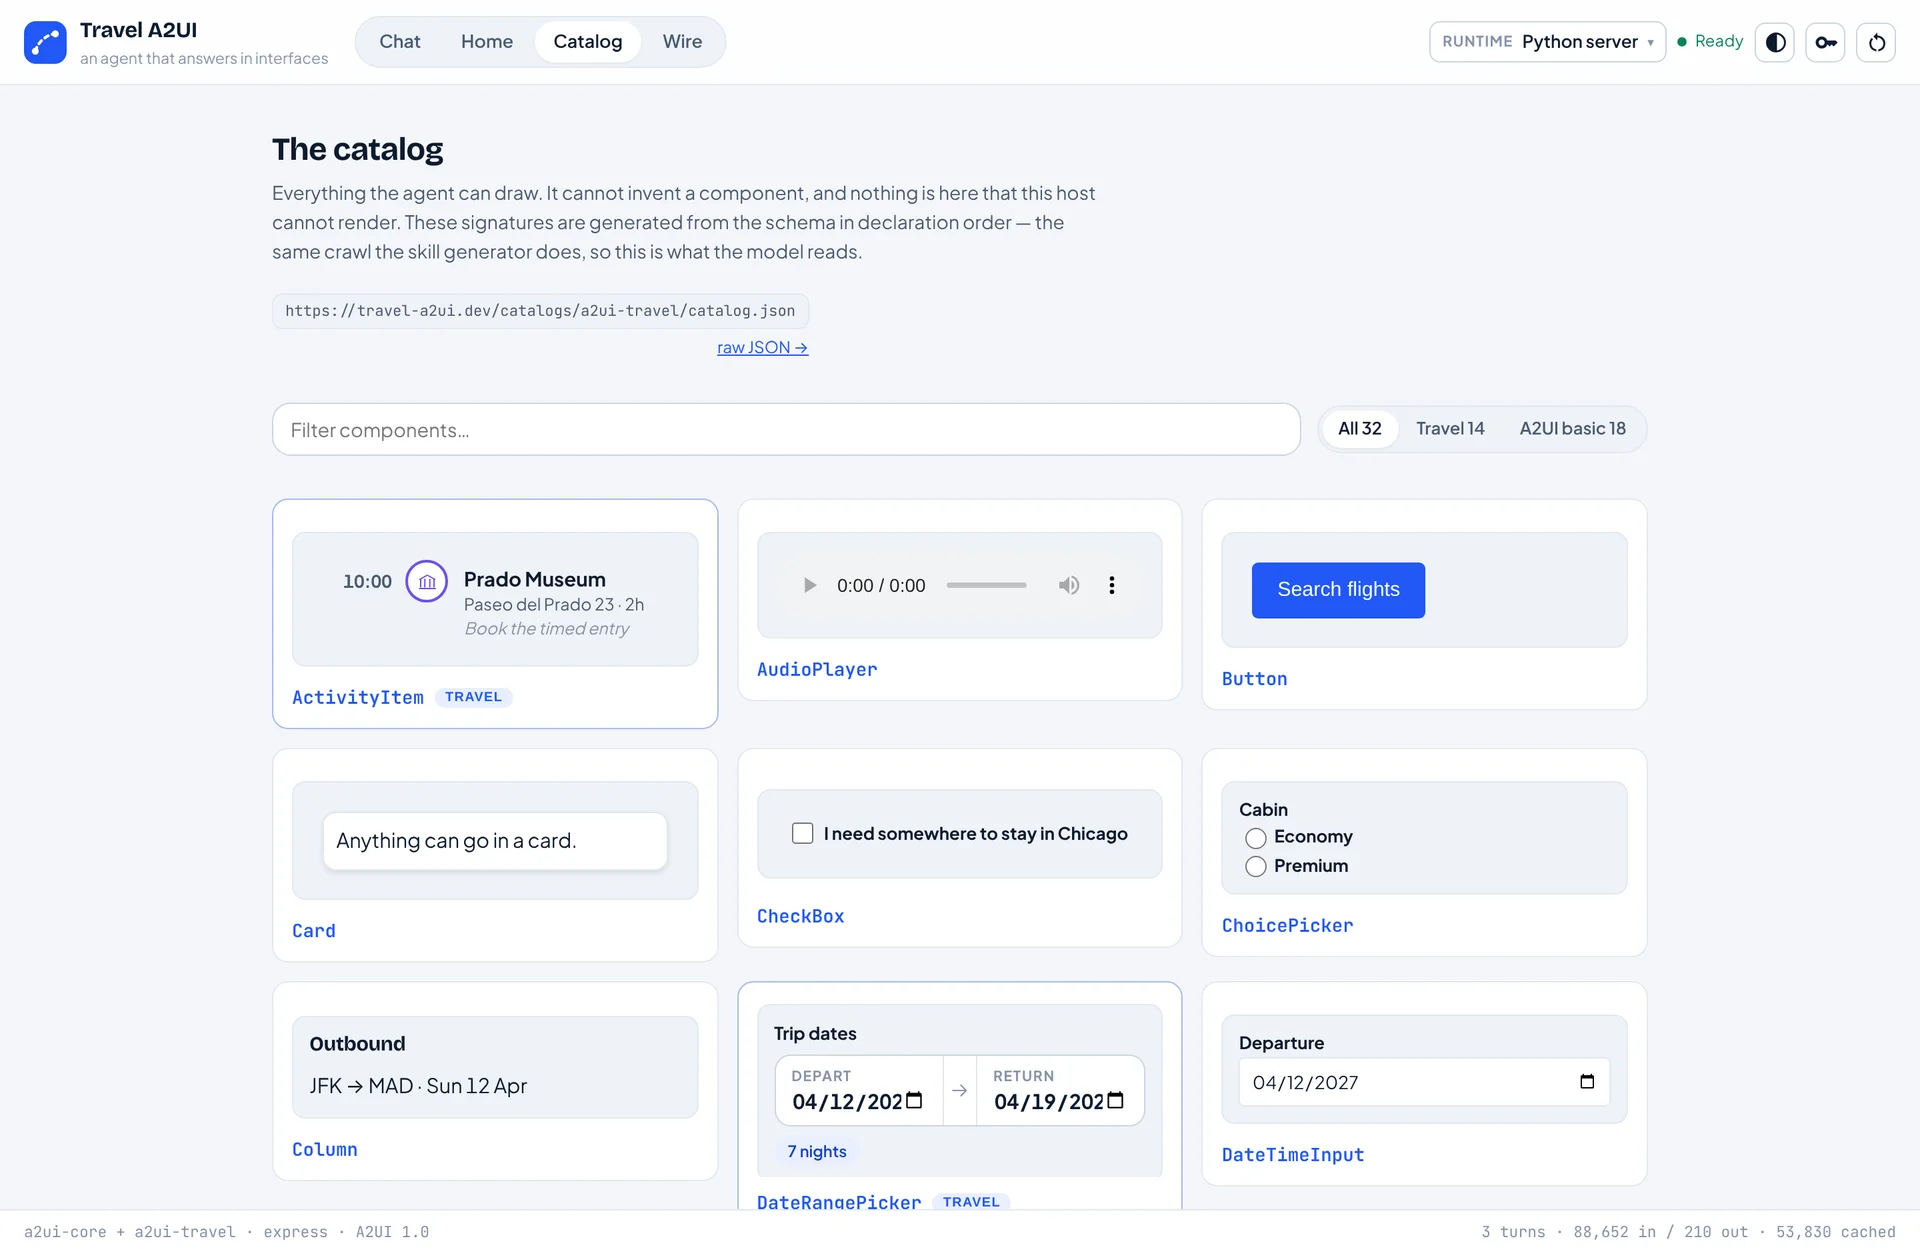
The catalog is also the guardrail. The server checks every message the model writes against it before sending anything, and each client implements every component and function in it, so the agent can only ask for what the client knows how to draw. The work splits between the model and you, the builder:
| The model decides | You, the builder, decide |
|---|---|
| Whether to show a card | Which components and functions exist (the catalog) |
| Which components, and the layout | The data in them |
| The wording | That every message is checked against the catalog |
| What to ask next | What a press records |
3. Skills: teaching the model A2UI
A skill is a Markdown file that teaches a model to write A2UI for a
catalog. This app has two, in skills/express-modular/: a2ui-core teaches
the notation, and a2ui-travel teaches this catalog. Here is an entry from the
second:
• FlightOption(airline, departTime, arriveTime, origin, destination, price, action (static), duration?, stops?, flightNumber?, …) - Description: A single selectable flight itinerary leg. Use one per option when presenting a choice of flights. - airline: Operating carrier, e.g. 'Iberia' or 'Delta'.Here the skills are generated from the catalog with the A2UI agent SDK’s
SkillGenerator (scripts/build_skills.py), so when a component changes,
npm run generate updates what the model is taught to match.
4. What the model writes, and what the client receives
The model writes A2UI Express, a short notation, as its skills taught it.
root comes first, so the card can appear before the rest is written:
root = Column([head, list])head = Text("### Flights to Madrid")list = List(_template($/flights, fare))fare = FlightOption($airline, $departTime, $arriveTime, $origin, $destination, $price, Event("select_flight", {id: $id}))On the server, the A2UI agent SDK reads the Express as the model streams
it, turns it into A2UI messages and checks each against the catalog. The
messages are JSON: createSurface, updateComponents, updateDataModel and
deleteSurface. Here is the component list one of these blocks became (trimmed
to ids and links): each component names its children by id, starting from
root.
[ {"id": "root", "component": "Column", "children": ["head", "list"]}, {"id": "head", "component": "Text", "text": "### Flights to Madrid"}, {"id": "fare", "component": "FlightOption"}, { "id": "list", "component": "List", "children": {"path": "/flights", "componentId": "fare"} }]In the client, a MessageProcessor from the A2UI SDK applies the messages:
it keeps each surface’s components and data, fills in bound values, runs
catalog functions, and sends presses back as actions. React uses
@a2ui/web_core’s (apps/web/src/surfaces.ts); Flutter uses a2ui_core’s
(apps/flutter/lib/chat.dart).
The web client’s Wire tab shows both forms of every surface side by side, what the model wrote and what the client received:
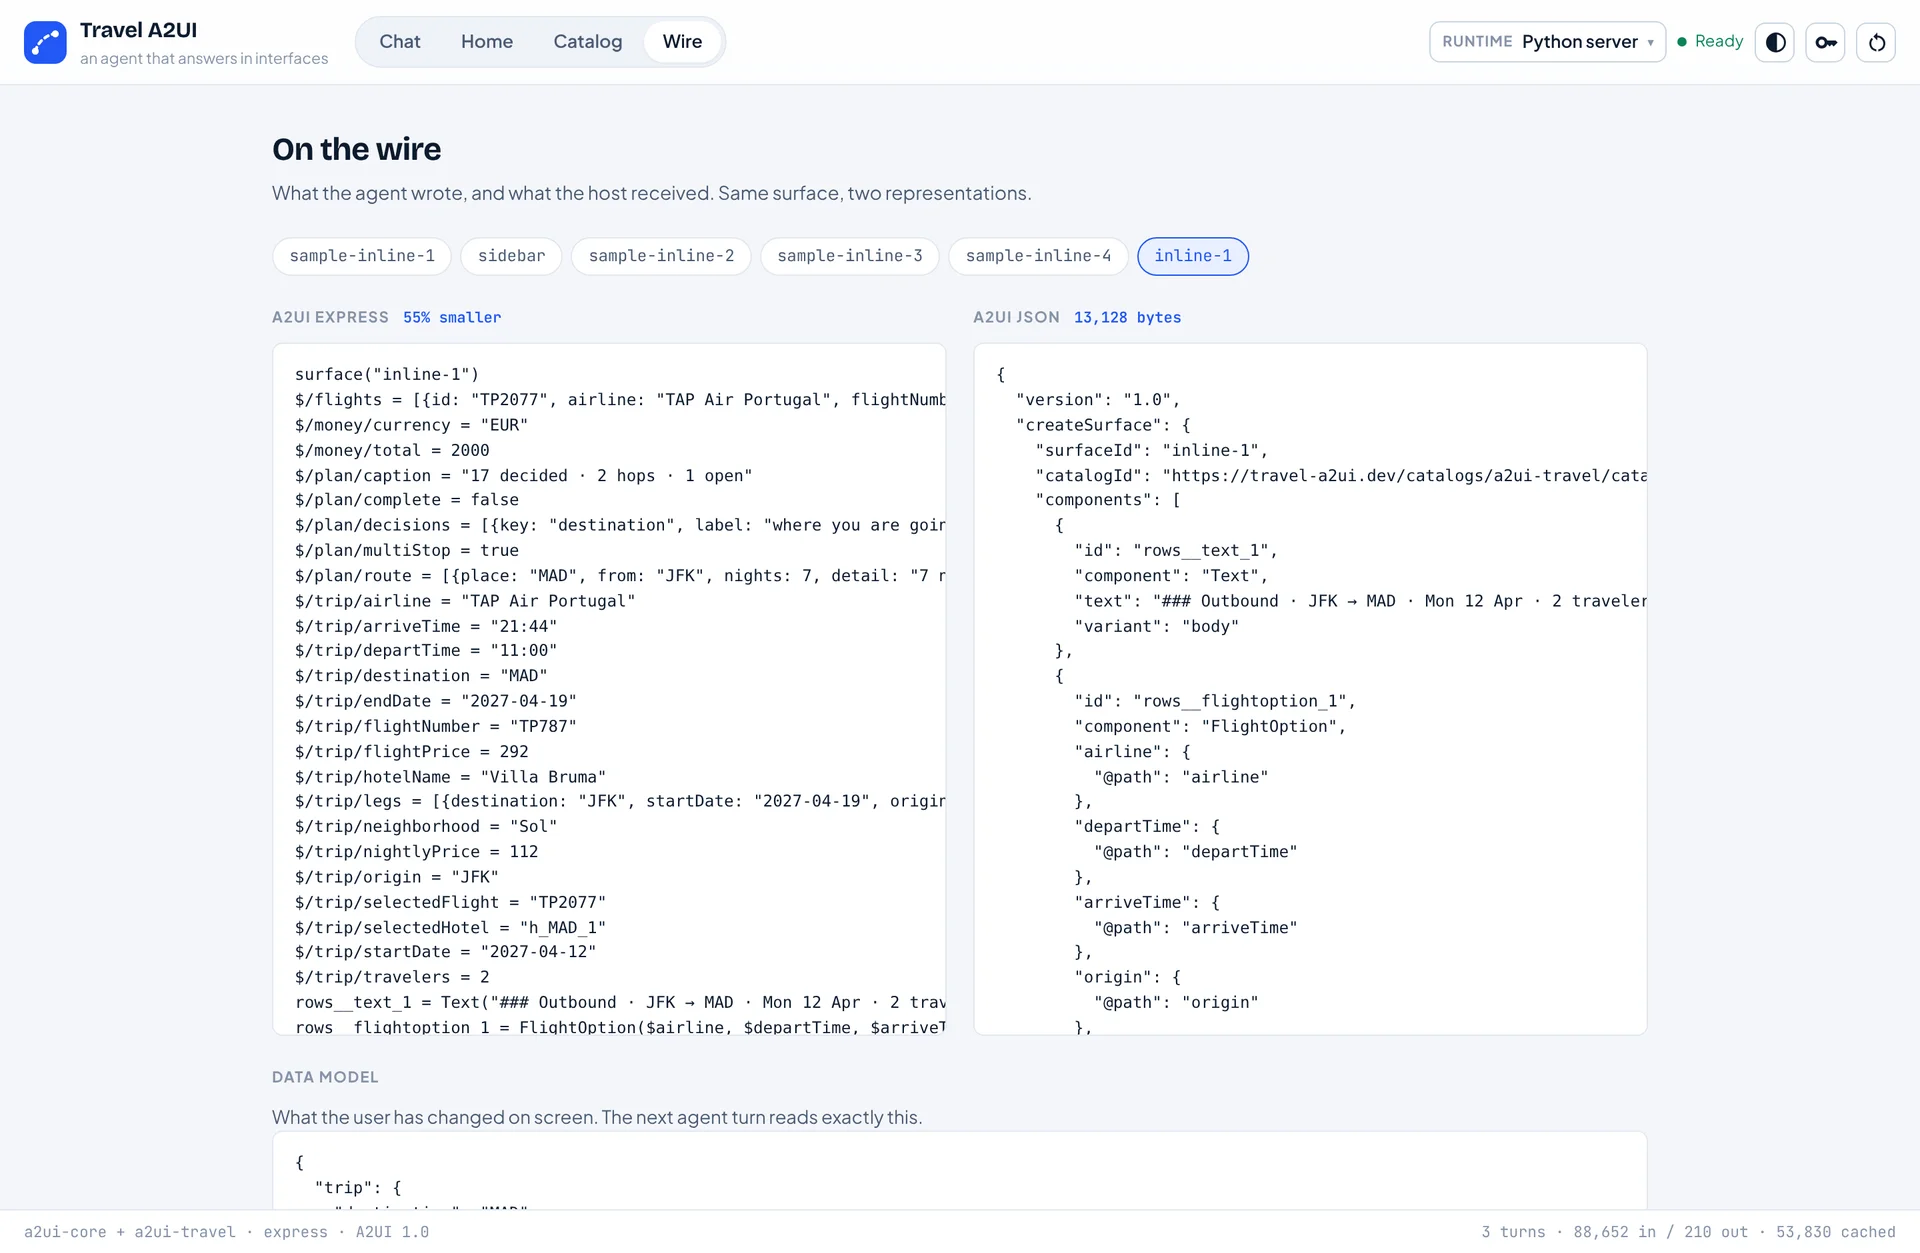
Express is one way for a model to write A2UI, chosen because it is short. A2UI itself is the JSON.
5. Renderers
A renderer implements the catalog’s components with native widgets and uses a MessageProcessor to apply messages. It holds no app logic.
- In this app: React (
@a2ui/react,@a2ui/web_core) inrenderers/react/, and Flutter (a2ui_flutter,a2ui_core) inrenderers/flutter/. The apps around them areapps/web/andapps/flutter/. - Maintained by the A2UI project: Lit (web components), Angular, React, Flutter, SwiftUI, Jetpack Compose and Markdown.
- From the community: UIKit, React Native, Vue, Lynx, a terminal renderer and more.
The server never knows which client it is talking to. Adding a platform means writing a renderer for the same catalog, with no change to the agent.
Deploy to Cloud Run
Run the quickstart app in your own Google Cloud project: the server and both clients on one URL. You need a project with billing enabled.

Cloud Shell opens with the sample and a short guide beside the terminal: sign in, choose a project, and run one script:
./scripts/deploy.shIt turns on the services the deploy needs, lets the build use them, then builds and deploys (about ten minutes the first time) and prints the URL. No key is stored on the service: each visitor pastes their own. From your own clone, the same script works anywhere the gcloud CLI is signed in; see deploying for what it runs.
Keep going
- Build your own: what to change to make this app about something other than travel.
- A2UI renderers: the official Renderer SDKs and community renderers.
- How A2UI works: the concepts, in depth.
- A2UI v1.0 specification.